- Score along all folding lines (center of solar panels, interior lines on MAG instruments, etc.). To score paper: use a black ball-point pen, preferably with a ruler, to make an indentation in the paper. This makes folding the pieces much easier, and results in a much nicer appearance.
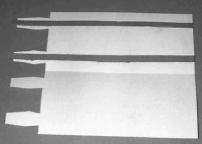
- Cut out the solar panels, MAG booms, and MAG instruments.
- For solar panels that do not have MAG booms attached, simply fold in half along center line and glue sides together. You should also reinforce the panels with sturdy flat objects, like plastic or wooden stirrers, or thin strips of cardboard. This will keep the panels from sagging under their own weight.
- For solar panels with attached MAG booms:
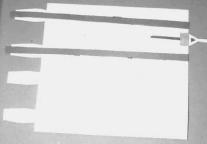
- fold MAG booms in half along fold line, and glue booms together up to the small square at the opposite end, with another reinforcing piece of some kind in between them.
- bend back the small squares 90†
- glue the other end of the boom to one half of the solar panel, so that the boom will be centered when the panel is glued together. The triangular portion should protrude from the solar panel.
- Glue the two halves of the solar panel together.
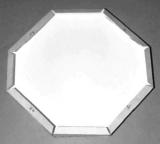
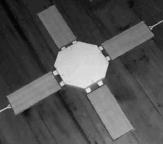
- The top panel, when assembled, will form a slightly irregular octagon about 20 cm across and 2 cm high. The upper surface is marked with the positions of each instrument, along with some extra details. The lower surface (with the dotted lines) shows the placement of tabs for the side panels.
- Cut out the top panel pieces, first scoring the side pieces where the tabs extend and in between the sides. Also cut out the long, thin, black rectangles -- these are where the tabs on the solar panels will fit in -- and, on the top panel, the innermost small circles of the little circular structures (later, the +Z low-gain antennas and the thrusters will fit into them).
- Glue the sides pieces together with the tabs, so that the tab that says "to +x" is glued to +x, etc. You should end up with a ring where longer sides alternate with shorter ones.
- Glue the sides to the upper +Z piece, so that the little circles (which represent rivets) are closer to the top, and matching +x to +x, -y to -y.
- Now is a good time to insert the solar panels: spread a little glue on one side of the solar panel tabs, push them through the long rectangular holes, and glue in place.
- Once the solar panel tabs are dry and secure, you may like to reinforce the top panel by adding struts of wood or cardboard, or by cutting a piece of cardboard to fit inside. Glue these down on the top +Z panel.
- Glue the bottom +Z panel into place, matching +x and -y again.
- Through the rest of the assembly, be careful not to bend the solar panels or MAG booms too much; the cardstock can take a little rough handling, but after a while it is more difficult to bend parts back into shape.
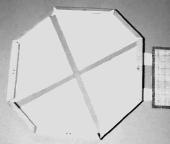
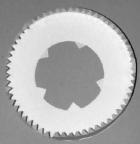
- Cut out the bottom panel shapes -- one will have balloon-like shapes on it, the other has some wiring on it, and you will also need to cut out the four odd shapes.
- It is best to reinforce the bottom with some cardboard -- glue the piece with the balloon shapes to a piece of thin cardboard, cut out the cardboard, and then you can glue the four odd pieces to the bottom. Ignore the labels on those shapes -- they should be glued into place so that the three spikes stick out of the +x, -x, +y, and -y sides.
- Next, glue on the -Z piece with the wiring printed on it. Make sure that the axes (x and y) all line up.
The panel without the balloon-like shapes houses instruments essential to the proper operation of the spacecraft, such as the slam electronics, slam battery, transponders, and other such electronics. The other panel is actually a 2-dimentional representation of the propulsion subsystem: the balloon-shaped objects are actually propulsion tanks, which rest against a pyramid-shaped structure (represented by the large "plus" shape). The spikes sticking out of the -Z panel were used to hold the folded-up solar panels in place against the spacecraft during transport and launch.
- Score along the long vertical lines of the Observatory Attach Fitting (OAF), as well as on the three tabs on the top.
- For ease of cutting, the three strips of the OAF share two rows of tabs, but once cut out, you should have three nearly-identical pieces which are then glued together at the ends to form a circle.
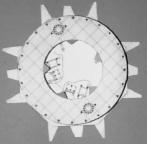
- Score the tabs on the -Z cover (the donut-shaped piece), and cut out the center portion, then the innermost circles of the two O-shaped features (where the -Z low-gain antennas will fit in). Cut out the -Z cover -- you may find that scissors work best to cut out circles.
- Fold the tabs of the OAF down, towards the inside, to be at a 90† angle with the circle. Spread glue around the outer edge of the -Z cover. Carefully glue the OAF to the -Z cover, keeping the OAF as perfect a circle as possible.
- Now apply glue to the -Z panel, just inside the printed circle, and glue the remaining tabs of the OAF to the -Z panel. (The holes for the low-gain antennas should be approximately along the X axis.) You may need to reach inside the -Z cover to press some of the tabs down.
- Cut out the high-gain antenna reflector. Also cut just one side of the wedge, so that when you bring that side over the wedge, you have formed a cone. The printed side should be on the interior of the cone. Glue the overlap in place.
- Apply glue to the five tabs on the -Z cover. Set the reflector into position such that the line is pointed towards the +X low-gain antenna hole.
- For now, don't glue the high- or low-gain antennas into place; you will be resting the model on the -Z side, and the antennas would just get in the way.