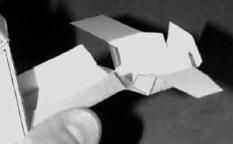
- The main body of EPAM folds up like a regular box -- just score along the tabs, fold, and glue in place.
- The other shapes represent some of the telescope apertures that EPAM uses to gather data, and are assembled as follows:
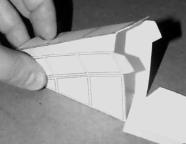
- Score along the vertical lines (next to the triangular tabs).
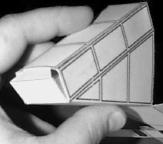
- Roll the shape such that the larger tab at the top wraps around to the bottom. (It's easier to do this if you roll the shape on a round pencil or pen.) Glue this tab into place.
- Fold down the triangular tabs, then glue the circles to the tabs.
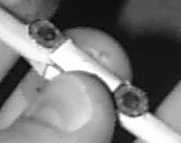
- Glue the completed telescope apertures to the main body of EPAM so that it resembles the photograph at right.
- The darkened box on the surface of EPAM represents another of the five telescopes carried by EPAM, a formation that would have been too small to include on the model.
- EPAM is positioned on ACE such that the face with the two vertical lines on it points outward.
EPAM was built by researchers at Johns Hopkins Universityís Applied Physics Laboratory (JHU/APL), and is a flight spare of an instrument built for the Ulysses mission. For more information, please visit http://www.gsfc.nasa.gov/ace/epam.html
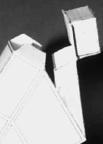
- Take care when scoring this model that you score only its actual faces -- in the lower part of the instrument, each face is divided into three sections, but those are there only for the pretense of accuracy, and are not to be folded or cut out.
- Score along the vertical lines, except for those indicated in the picture. Score also along the horizontal lines, and those bordered by tabs. Only one diagonal line (plus the tabs) will be scored: note that on the right side of the instrument, there are two actual faces, one of which is wider than the other. Score around this face only: the other diagonal face, and the wedge-shaped one, form a single face when folded, as may be apparent in the photograph at right.
- Carefully cut out the instrument, remembering to cut slits between the diagonal faces at the bottom and the tabs that will connect them to the smaller rectangle adjacent to them.
- To glue the instrument together, begin with the lower half. You will not use the three top diagonal tabs until after the next step; only the tabs on the lower end, the large diagonal one, and the two on the middle connecting piece should be glued at this time.
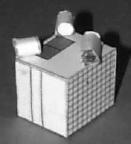
- The top section folds together like another, separate box. The unprinted rectangle forms the bottom, while the tiny rectangles with black rectangles printed on them jut out from the sides of this box, along the bottom plane. (This can be seen to some extent in the photograph.)
- Once that box is finished, it can be glued to the tabs leftover from before the previous step.
- ULEIS is positioned on ACE with the small black box -- the portion that collects particles -- pointing outwards.