Part 3: Directory and File Organization
Since you have learned the basic HTML features, you are ready to move on to making your page more complicated. Before your page, or what will probably become pages, get to complicated, though, you will probably want to think about organization and directory structure. It is much easier to start with a good directory structure and use this in your coding than to try to organize a directory of 50 or more documents into sub directories. This is because each time you move a document, you have change the coding of other pages that pointed to the document.
To organize your page, start to think about the major sections of your page (ex.- teams, purpose, activities, etc.) Each of these may deserve a folder or directory of its own, especially if you plan on expanding that section in the future. Each directory or folder should have a sub-folder for pictures. Good directory structure helps you to organize your site so that it is easier for you to find what you are looking for, and it is also easier for someone else to figure out what you have done. If you stick all of your documents and pictures into one directory, it is quite an overwhelming task to figure out what is going on. Having constant sub-folders such as one for pictures also helps to organize. You can code much more quickly when you know where everything is and where it is supposed to go. Moving things between folders is also much quicker and less painful when you are consistent. Therefore, make sure that you spell and capitalize names consistently as well. For example, do not use "Pictures" in one place and "pictures" somewhere else.
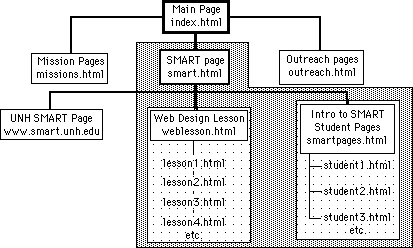
Many professional web designers start a project by making a "map" of the site they will be designing. They brainstorm all of the sections that may be necessary, and then organize them according to some logical hierarchy, as in the example below. The files within a given shaded area are in the same folder, such that all of the Web Lesson files are in a Web Lesson folder, which is within the SMART folder. The darker lines show links between main pages, while the lighter lines (between the web lesson and student pages, for example) are links between sub-pages. The Web Design pages are in a linear order (lesson 1 is followed by lesson 2, etc.) while the SMART student pages are all linked from smartpages.html, and not to each other. If you prefer an outline-style format, the structure would look more like this:
You are ready to try a lesson on directory structure:
This is a quick lesson on implementing good directory structure and will basically help you to begin setting up the directory structure that you will use for the remainder of the lesson.
First, make a main directory (folder) to store your web pages in. The name should be short but descriptive (ex. - SMART). Copy or move the document that you recently made in Lesson 1 into this folder. Also make a folder for Pictures. Brainstorm for a few minutes about some sub-pages which you would like to include. Make folders (within the main folder you just created) for each of these main topics. Also, within these sub-folders, create a folder for pictures in each, making sure to be uniform with capitalization. Good directory structure acts as a good outline for your page, helping to organize your thoughts much as a good outline organizes a research paper.
On to Part 4: Tag Introduction